Writing a Connhex Edge service
After connecting your first edge, it's now time to have it send some data.
In this example, we will implement a virtual sensor (a.k.a. mock data) for battery charge state.
We'll then turn the readings into a SenML message and create an update loop to publish them at scheduled intervals. We'll also take care of listening for incoming messages from Connhex Cloud.
In this example, we'll be using SenML since it is a great choice for many use cases. Note that it is not strictly required: as discussed in depth here, Connhex natively supports multiple message formats.
Finally, we'll use an heartbeat message to notify the Connhex Edge agent that our service is up and running. Let's get started!
Prerequisites
This simple example is available in JavaScript and Python: this means your device needs to have Node.js or Python installed.
You'll also need to install the NATS package:
- JavaScript
- Python
npm i nats
pip3 install nats-py
If your device cannot run Node.js or Python, porting this service to any other language for which a NATS client is available should be straightforward.
- JavaScript
- Python
const { connect, JSONCodec } = require('nats');

const jc = JSONCodec();
const SERVICE_NAME = 'diagnostic';

// Sends a heartbeat message every 10s to notify
// connhex-edge-agent that this service is working properly.
// By default the connhex-edge-agent checks that all services have sent
// a heartbeat message within the last 10s (customizable).
// If a service didn't, it is marked as offline.
const startHeartbeat = (nc) => {
  const intervalId = setInterval(() => {
    console.log('Publishing heartbeat...');
    // Any custom logic that checks that everything is ok should be added here.
    nc.publish(`heartbeat.${SERVICE_NAME}.service`);
  }, 10000);

  return {
    stop: () => clearInterval(intervalId),
  };
};

const startUpdateLoop = (nc) => {
  const intervalId = setInterval(() => {
    // Build a SenML message
    const msg = [
      {
        t: Date.now() / 1000,
        n: `urn:cpt:${SERVICE_NAME}:battery-charge`,
        u: '%EL',
        v: Math.floor(Math.random() * (100 + 1)),
      },
    ];
    console.log(`Sending message: ${JSON.stringify(msg)}`);

    nc.publish(`events.data`, jc.encode(msg));
  }, 60000);

  return {
    stop: () => clearInterval(intervalId),
  };
};

(async () => {
  const handleExit = () => {
    nc.drain()
      .then(() => updateLoop.stop())
      .then(() => heartbeat.stop())
      .then(() => process.exit(0));
  };
  process.on('SIGINT', handleExit);
  process.on('SIGQUIT', handleExit);
  process.on('SIGTERM', handleExit);

  const nc = await connect();
  console.log('NATS connected');

  const updateLoop = startUpdateLoop(nc);
  const heartbeat = startHeartbeat(nc);

  // Subscribe to NATS subject and listen for commands received.
  // ">" is used as wildcard, check https://docs.nats.io/nats-concepts/subjects#characters-allowed-for-subject-names
  sub = nc.subscribe(`commands.${SERVICE_NAME}.>`);
  for await (const m of sub) {
    console.log(
      `Received command: [${m.subject}] ${JSON.stringify(jc.decode(m.data))}`
    );
  }
})();
import asyncio
import json
import signal
import sys
from random import randrange
from time import time

import nats
from nats.aio import client, msg

SERVICE_NAME = "diagnostic"


# Sends a heartbeat message every 10s to notify
# connhex-edge-agent that this service is working properly.
# By default the connhex-edge-agent checks that all services have sent
# a heartbeat message within the last 10s (customizable).
# If a service didn't, it is marked as offline.
async def start_heartbeat(nc: client.Client) -> None:
    while True:
        print("Publishing heartbeat...")
        # Any custom logic that checks that everything is ok should be added here.
        await nc.publish(f"heartbeat.{SERVICE_NAME}.service")
        await asyncio.sleep(10_000 / 1000.0)


async def start_update_loop(nc: client.Client) -> None:
    while True:
        # Build a SenML message
        msg = [
            {
                "t": time(),
                "n": f"urn:cpt:{SERVICE_NAME}:battery-charge",
                "u": "%EL",
                "v": randrange(0, 100),
            },
        ]
        print(f"Sending message: {msg}")
        await nc.publish(f"events.data", json.dumps(msg).encode("utf-8"))
        await asyncio.sleep(60_000 / 1000.0)


async def main() -> None:
    async def handle_exit():
        await sub.unsubscribe()
        update_loop_task.cancel()
        heartbeat_task.cancel()
        sys.exit(0)

    for signame in ["SIGINT", "SIGQUIT", "SIGTERM"]:
        asyncio.get_event_loop().add_signal_handler(
            getattr(signal, signame),
            lambda: asyncio.create_task(handle_exit()),
        )

    nc = await nats.connect()

    async def handler(msg: msg.Msg):
        subject = msg.subject
        data = msg.data.decode()
        print(f"Received command: [{subject}] {data}")

    # Subscribe to NATS subject and listen for commands received.
    # ">" is used as wildcard, check https://docs.nats.io/nats-concepts/subjects#characters-allowed-for-subject-names
    sub = await nc.subscribe(f"commands.{SERVICE_NAME}.>", cb=handler)

    async with asyncio.TaskGroup() as tg:
        update_loop_task = tg.create_task(start_update_loop(nc))
        heartbeat_task = tg.create_task(start_heartbeat(nc))


if __name__ == "__main__":
    asyncio.run(main())
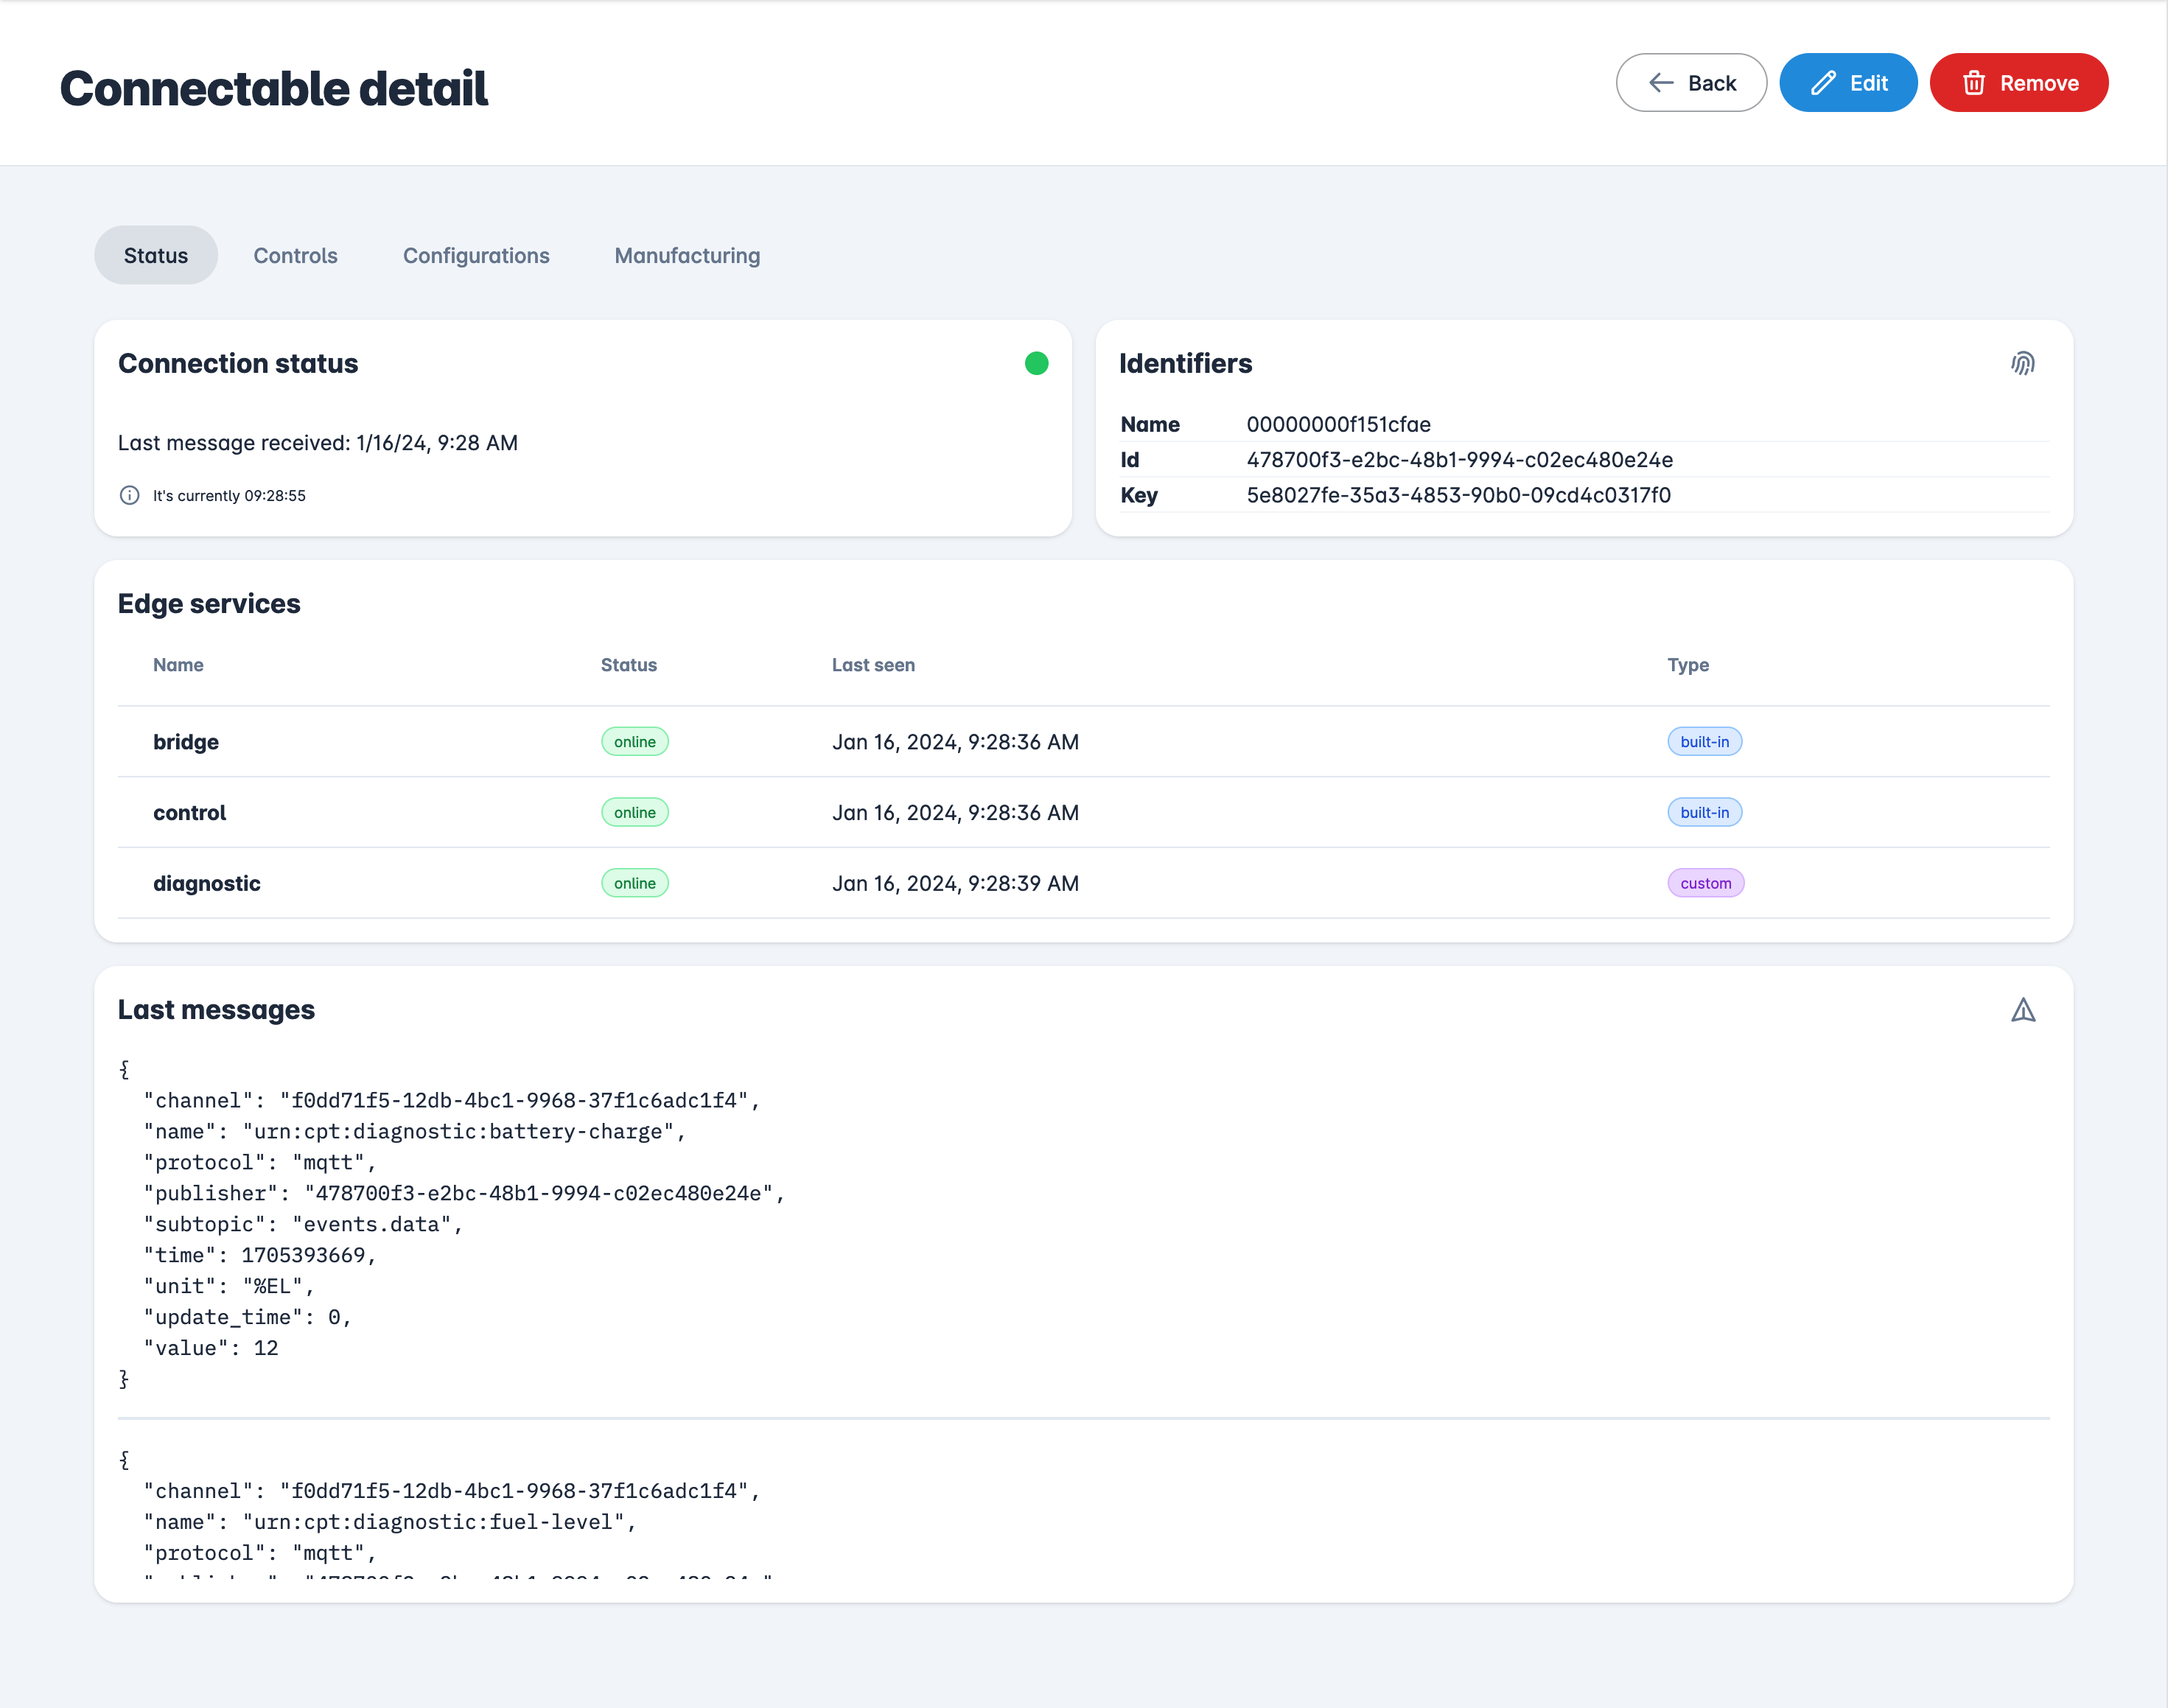
Go back to Connhex Control and navigate to the device detail page. You should see the diagnostic service detected as online and the raw messages printed in the Last messages section.
Sending custom commands to the service
We can interact with the diagnostic service by sending custom commands directly from Connhex Control.
Connhex Edge listens for messages addressed to custom services in the MQTT services subtopic. These messages are then
mapped internally to the commands NATS subject (you can find more details here).
For example, to target our service listening on the commands.diagnostic.> NATS subject, we can send our MQTT messages to the services.diagnostic.test subtopic.
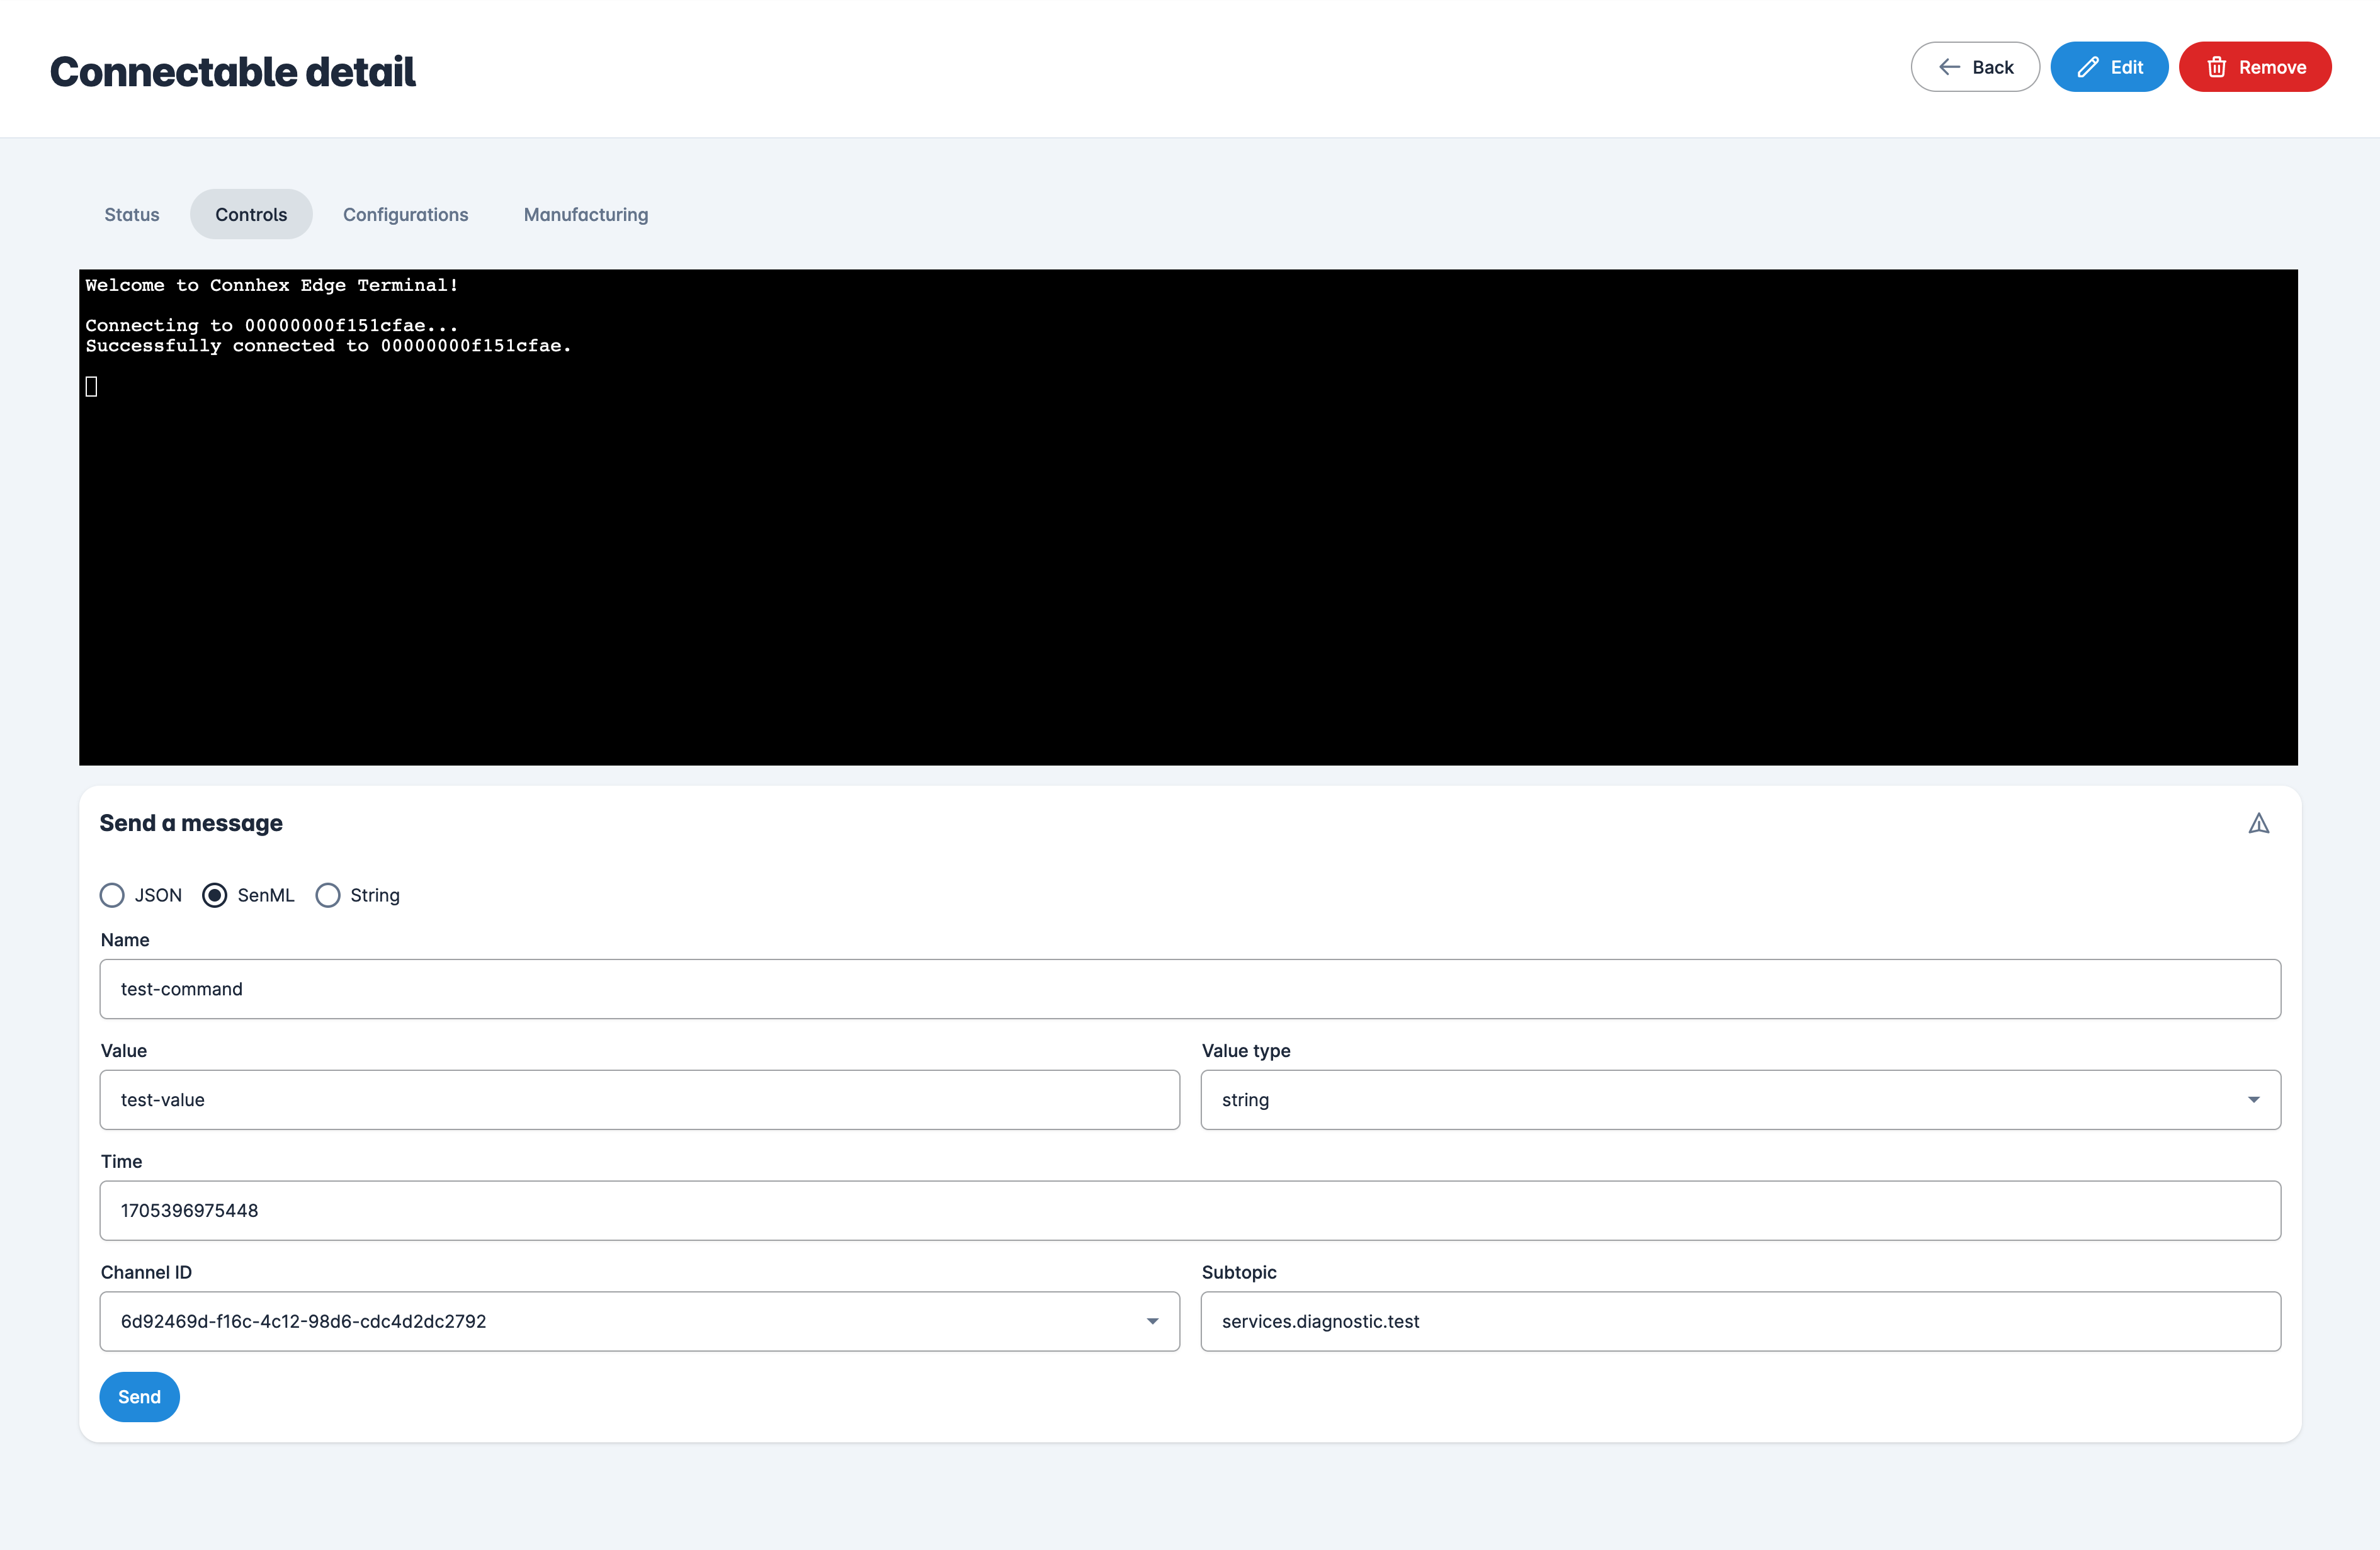
If we check the console of the device running the example, we should see the following output, indicating that the message was correctly received and processed by the service!
Received command: [test] {
  name: 'test-command',
  value: 'test-value',
  chanID: '6d92469d-f16c-4c12-98d6-cdc4d2dc2792',
  subtopic: 'services.diagnostic.test',
  time: '1705396975448',
  valType: 'string'
}
What's next?
Now that we have a Connhex Edge service ready, let's look at how we can get this ready for production.